Pins recall alert published by the United States Consumer Product Safety Commission ( CPSC) and…
Avoiding Plastic Injection Molding Defects: Key Preventive Measures
BY RENAUD ANJORAN
Plastic injection molding is one of the most common production processes here in China. And most Chinese manufacturers are not very good at setting up and maintaining their presses and their molds…
If the right polymer is used, and if the factory adopts the right process control measures, there is a low probability for things to go wrong. I have met many manufacturers that don’t understand that…
There are a multitude reasons for parts to be rejected. Some of the more common defects are listed below, along with the key preventative measures.
Sink Marks
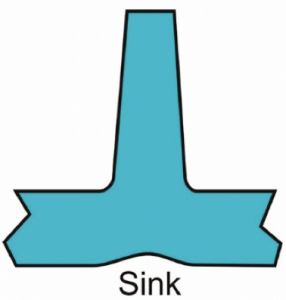
A sink mark is a depression on the surface of the molded part and is generally found where there are bosses or ribs on the underside of the molding. These intersections result in a thicker material section and the cooling is uneven in these areas.
As the material cools, the outer surface cools faster than the inner and with the outer surface solidified, the inner molten material begins to cool, solidify and shrink thus pulling on the already solidified surface.
This irregular cooling and shrinking of the material around thicker areas is the cause of most sink marks.
Key Preventative Measures
- Ensure wall thicknesses are uniform wherever possible
- Make ribs 50% to 80% of the wall thickness it is connected to
- Select the thickest section of the part to add the injection gate, this allows the thickest parts to injected first
- Do not have the gate size too small as this will prevent the optimum fill and packing of the mold
- Avoid large thick areas in the design, better to have a ribbed or honeycombed design if you are looking for strength and rigidity
- Increase the injection pressure during the process, this will force more material into the mold and reduce the shrinkage
- Reduce the injection temperature of the material and the mold
Voids
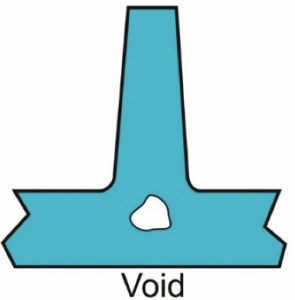
Voids or air pockets tend to occur in thicker sections of a molded part, this is caused when the surface cools and solidifies faster than the inner material.
As the inner material is cooling it also shrinks, but if it is unable to fully shrink, the material molecules will be pulled apart thus creating voids.
Key Preventative Measures
- Ensure there are no unnecessary thick sections in the part design
- Increase the gate size to ensure optimum mold fill
- Increase shot volume, increase injection pressure, increase screw forward time, reduce melt temperature, or adjust injection speed
- Ensure material is dried correctly, moisture in the material will cause voids
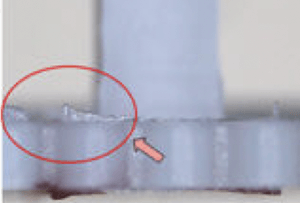
Weld Lines
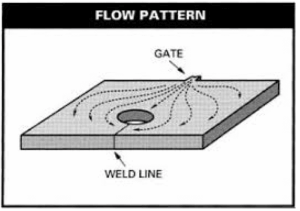
Weld lines are created when two melt fronts come together but do not bond with each other because they have partially solidified. When the part is fully solidified, the weld lines often look like two plastic planes have come together.
Key Preventative Measures
- Having a design where the flow is continuous and not split will prevent weld lines
- If a split in molten plastic is unavoidable, ensure the position of the gate allows the melt fronts to come together evenly at the same time
- Raising the temperature of the mold or molten plastic will help when the two melt fronts come together
- Increasing the injection speed will help the melt fronts come together quicker, while still molten
Short Shots
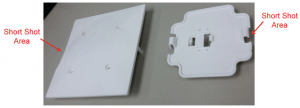
Short shots occur because the mold is not completely full before the plastic solidifies, resulting in a partially molded part.
Another reason for short shots is trapped air or gas in the mold cavity, the molten plastic cannot occupy the same space as the gas, therefore resulting in a short shot mold.
Key Preventative Measures
- Ensure the gate size is large enough to fill the mold cavity
- Ensure the tool has adequate gas/air vents to allow the gas build up to escape the cavity
- Increase the temperature of the mold and plastic being injected, this will help fill the mold faster
- Make sure there is enough material being injected into the mold per shot
- Increase the injection pressure
Burn Marks
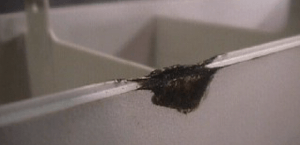
Burn marks show up on the finished part as charred or dark discoloration which is caused by trapped gas overheating in the mold.
It can also be an effect of plastic degradation due to excessive heat or by the injection speed being too fast.
Key Preventative Measures
- Ensure the tool has adequate gas/air vents to allow the gas build up to escape the cavity
- Reduce the injection speed
- Reduce the injection pressure
- Reduce the temperature of the plastic during injection
- Make sure the part design does not have any feather edges as this can increase the chances of burn marks
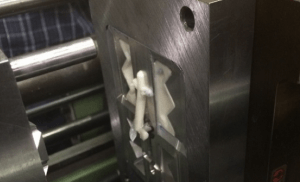
Flash
Flash is a defect where molten plastic has escaped the cavity, generally at tool parting lines or vent areas or even down ejector pins.
Key Preventative Measures
- Ensure the clamping pressure is being maintained during the injection process
- Increase clamp pressure (this could mean changing machines to a larger clamp force capability)
- Make sure the surfaces of the mold is clean and not damaged before it is loaded into the machine
- Reduce the injection pressure
- Reduce the temperature of the mold and plastic being injected
- Check the diameter of the ejector pins and the pin hole tolerances, if the tolerance is too wide this could allow molten plastic to flow down between the pin and hole surface
- Make sure the venting is not too large
Flow Lines
 Flow lines or streaks in the surface of the finished part can be a cause for reject if the part is required for aesthetics. Flow lines are caused by the molten plastic flowing at different speeds throughout the cavity and the change in direction of the melt front due to the design of the mold.
These lines occur as the plastic starts to solidify at different speeds, in some cases the molecules are dragged along the surface of the mold causing streaks.
Key Preventative Measures
- Ensure the design of the tool has rounded edges wherever possible.
- Increase the speed and pressure of the injection process
- Increase the temperature of the mold and the molten plastic during the injection process
- Increase the size of the gate to allow optimum mold filling
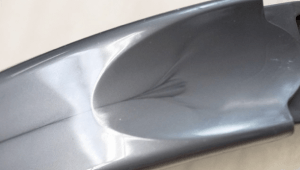
Warping
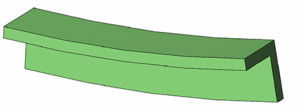 Warping occurs when the part cools unevenly and creates internal tension within the part. When the part is ejected from the tool, the part will warp as the internal tension is released.
Key Preventative Measures
- Ensure the cooling time is controlled to allow the plastic to solidify evenly, the variables requiring control would be cooling time and the cooling temperature rate
- Reduce the temperature of the material during injection and the temperature of the mold
- Make sure the gate position allows the cavity to fill evenly as possible, if the cavity is filled in all extreme points the same, the solidification process is more even which helps eliminate warping of the part
- Select plastic materials that are less likely to shrink and deform. Semi-crystalline materials such as Polyphthalamide (PPA), Polyetherketone (PEK), and High Temperature Nylon (HTN) are generally more prone to warping.
Part sticking in tool
 When the molded part sticks to the mold, it fails to separate from the cavity or is held by a feature of the tool design which can occur for many reasons.
Key Preventative Measures
- Ensure the ejector pins are not broken, without ejector pins the part cannot be pushed out of the mold
- If the draft angle is too shallow, there will be too much surface friction between the cavity surface and the part preventing it from being ejected. In this case, draft angle needs to be increased
- Surface finish to too rough causing too much surface friction between the cavity surface and the part preventing it from being ejected. Two things to change in this instance, smooth and polish the surface of the cavity if a smooth surface is permissible in the design, if not, the draft angle needs to be increased to allow for the rough surface to separate between the part and the cavity surface
- Ensure there are no undercuts in the design, these would prevent the part being ejected as the part would hang on the undercut surface
- Make sure there are no defects or scratches on the cavity surface as these could act as undercuts and hold the part during ejection
- Ensure a release agent is applied to both parts of the tool between each injection cycle
Article Source: https://qualityinspection.org/avoiding-plastic-injection-molding-defects-key-preventive-measures/
Related Posts

This Post Has 0 Comments